Monday, 11 April 2016

Thursday, 7 April 2016

How to Fix the "bootmgr is missing" Error

If your Windows 7 or Vista computer has encountered the dreaded “BOOTMGR is missing” error, you aren’t alone. If the problem isn’t hardware related you can fix it with relative ease as long as you have a Windows DVD handy. And Even if you have the Windows 7 Boot Repair Disk.

So, I guess you all know how to boot off your Windows Disk,
Restart your Computer, On the POST Screen look for the Option for Something like "Press F12 for Boot Settings" or "Press Del to enter BIOS Setup". Look for it. If you have Boot Set. Option then enter into it and Select to Boot from Whatever your Windows Bootable Media is. (In my case it was USB).
Now, As soon as you boot from your Windows Bootable Media, you will find Windows 7 Installation Welcome Screen.
Select your Language Preference & click Next.

On the Next Screen you will find Install Now Option. See in the Bottom Left Corner, you will find an option for "Repair your Computer". Click on it.

The installation process will attempt to find your Vista installation directory. If there’s more than one in the list, select the correct one and then use the Next button again.

Now, In the Box, "System Recovery Options", Click on the First Link "Startup Repair".

The installation process will Automatically repair the system, and then prompt for you to reboot.
And now It should have been Repaired.

------------------------------------------------------------------------------------------------------------------

ALTERNATE METHOD [ONLY FOR ADVANCED USERS]
If the Startup Repair was Unable to Fix the Problem, Proceed to this Step :
Boot your Windows Bootable Media Again and come to the Same Screen saying "System Recovery Options".
Here, Click on Command Prompt Link.
Command Prompt will Launch.

Now type these with Space where stated as <SPACE> :
"bootrec /fixboot [Space after bootrec]
At this point you should be able to reboot your computer, remove the DVD and everything should be working.

for more...

visit to..

www.4stupids.in/

and don't forget to subscribe our youtube
channel...


How to Secure your private and sensitive files?


Introduction
Welcome to SanDisk SecureAccess™!

SanDisk SecureAccess™ is a fast, simple way to store and protect critical and sensitive files on any
SanDisk ®
USB flash drive.  Create a private vault and simply drag-and-drop your valuable files
inside.  Access to your vault is protected by a personal password, and your files are automatically
encrypted – so even if you share your SanDisk USB flash drive or it becomes lost or stolen, access
to your files are safe.

When it comes to protecting your private files, you can trust SanDisk ® !

Supported Operating Systems:
· Windows ® XP

· Windows Vista ®

· Windows ® 7

· Windows ® 8

· Mac OS ® X v10.5+

Required Hardware:
· Available USB port
· SanDisk USB flash drive

Getting Started
After connecting your SanDisk USB flash drive to a computer, double-click the
SanDiskSecureAccessV2_win.exe (executable) file to run the SanDisk SecureAccess software (Fig.
1).  (Some computers may require you to open the computer directory to locate connected drive.)


Fig. 1


Set-up
Setting-up your private vault is simple!

1. Enter a personal password for your private vault.  Password must be at least 6 characters
and contain numeric and alphabet characters.  Enter a hint to help you remember your
password (Fig. 2).


Fig. 2


2. Click ‘OK’


You are now ready to keep your valuable and sensitive files in your new private vault, and protect
access to them!  (Fig. 3)

               
Fig. 3
Adding files or folders into your private vault
1. Select the files you want to add, and drag-and-drop them right into the main screen (Fig.4).

                   
Fig. 4

2. Add files manually by clicking on the ‘Add File’ icon from the My Vault menu bar, and select
the files you want to add (Fig. 5a and 5b).

                        
Fig. 5a


Fig. 5b


Download

EnjoyJ
Stupidity never Ends . . .


Saturday, 26 March 2016

Create a second Apple ID and download apps in other countries..

Step 1: Sign out of iCloud


To create a new iTunes account, you'll first need to sign out of your current iTunes/iCloud account. Do this by opening Settings and tapping iCloud. Scroll to the bottom of the screen, where you'll see a button that says Sign Out. Tap Sign Out to sign out of your iTunes/iCloud account -- your iPhone will warn you that if you sign out of your account, all photo stream photos, documents, and data stored in iCloud will be removed from your iPhone.

Step 2: Create a new account


Once you're all signed out of your iTunes/iCloud account, you can create a new account. Go to Settings > iCloud and tap Create a new Apple ID. 


3.png

You'll be asked to enter in a birthdate, name, and email address (you'll need to enter in a different email address from your other iTunes/iCloud account). You will also be asked to choose a password, pick and answer three security questions, and input an optional rescue email address. Once you've filled everything out, tap continue (this may take a moment).


Step 3: Verify your account

Check your email to find Apple's verification message. Click on the link in the email message to verify your email your address. Apple will ask you to sign into your new iCloud account to verify your address.

Step 4: Choose the country on your new iTunes/iCloud account

Before you can start grabbing apps from another country, you'll need to pick the country on your new account. To do this, open the App Store and tap Featured. Scroll down to the bottom of the page, where you'll see a button that says Sign In. Tap this button and sign in using your new iTunes/iCloud credentials.
4.png

You should see a pop-up informing you that you haven't used this Apple ID on the iTunes store. Tap Review and wait a few seconds, and a list of countries will appear on the screen. Choose the country you want your new ID to be associated with, and then tap Next. Apple will ask you to agree to some terms and conditions, tap Agree. 

Next, Apple will ask for your billing info. In order to move forward, you will need to input a billing address and phone number that matches the country you chose, but you do not need to add a credit card at this time. So you can use any address -- a government building, a bank, a hotel. You won't be able to download paid apps without a credit card, but this way you'll at least get to download free apps from that country.


THANK YOU.......

FOR MORE VISIT TO....

www.4stupids.in/

AND DON'T FORGET TO SUBSCRIBE OUR YOUTUBE 

CHANNEL........

Thursday, 24 March 2016

HOW TO CONTROL YOUR C.P.U FAN SPEED

Step 1: Install Fan-Controlling Software


Control Your Computer's Fan Speeds for Better Performance When You Need It, Silence When You Don't


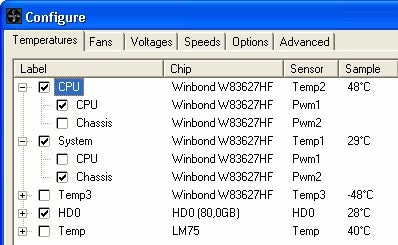
These will give you the most control over your fans, letting you choose how fast they're running at any given time. SpeedFan can even monitor your computer's temperatures and adjust the fans accordingly. And, if you head to SpeedFan's configuration, you can even tell it your desired temperature and have it adjust your fans automatically based on that. Just be conservative, since your motherboard's temperature values aren't always accurate to the degree.......
step-2- Tweak Your BIOS Settings


Control Your Computer's Fan Speeds for Better Performance When You Need It, Silence When You Don't

BIOS settings (usually by holding a key like Delete when you boot your computer), and search for the fan settings. They're called all sorts of different things (for example, Asus has "Q-Fan Control", while Gigabyte has "Smart Fan Control"), but generally you should be able to find it under one of the BIOS menus. Enable this feature, and tweak any settings it gives you to your liking. Some machines may only let you set it to conservative or liberal mode, while others will let you individually set temperature thresholds like SpeedFan.
                                                           It'll also offer you a choice between two regulation methods: voltage and PWM. The voltage mode adjusts the voltage of the fan, while PWM mode sends calculated voltage pulses to the fan to make it run a bit slower. For the most part, this depends on how your fans are plugged into the motherboard. Fans connected with a 4-pin connector should use PWM, while fans connected with a 3-pin connector should use voltage. Voltage is slightly less efficient, and you can't get speeds quite as low as with PWM, but PWM can be finicky sometimes too. If you find PWM is giving you problems, you can always switch to voltage. And, if you can't connect your fans to the headers on your motherboard (that is, if you're using the large, 4-pin Molex connectors), you'll need to use method 3 below. Again, your motherboard will only support this kind of fan control for a few fans, too (usually your CPU fan and a system fan). If you want to control them all, check out method three below.


THANK YOU.........

FOR MORE VISIT TO......


AND DON'T FORGET TO SUBSCRIBE 

OUR YOUTUBE CHANNEL.............


Stupidity never End.....


opera br0wser free internet 0n airtel4stupids in

uc browser free internet on airtel

Wednesday, 23 March 2016

HOW TO MAKE A PARTITON ON UBUNTU

image

After Installing Ubuntu

If you don’t create a separate home partition while installing Ubuntu, you don’t have to reinstall Ubuntu from scratch. To migrate to a separate home partition after installation, you’ll have to create a new partition (which may require resizing your existing partitions), copy the files from your existing home directory to that partition, and tell Ubuntu to mount the new partition at /home.

Step 1: Create a New Partition

If you have some free space, this step is easy. If you don’t, you’ll have to resize your system partition and create a new partition in the free space. If you have free space or don’t need to resize a system partition, you can just install GParted and create the partition without restarting from a live CD – you’ll want to create an ext4 partition.


image


Step 2: Copy Home Files to New Partition

Ubuntu makes it easy to mount the new partition – just click it under Devices in the file manager. After you do, click the Go menu and select Location to view its mount point.

image

Launch a terminal and run the following command to create a copy of your current /home directory on the new partition, where /mount/location is the location of your mounted partition:

"sudo cp -Rp /home/* /mount/location"

You’ll see an error about a .gvfs directory – this is normal; you can ignore it.

image

You should check the new home directory to verify it contains your files. However, we won’t be deleting the old home directory just yet.


image

Step 3: Locate the New Partition’s UUID

The long, random-looking string above is actually the partition’s UUID, and we’ll need it to add the partition to our fstab file, which tells Linux where to mount partitions when it boots. You can also locate the partition’s UUID by running the following command in a terminal:
"sudo blkid"

image


Step 4: Modify the fstab File

Before modifying our fstab file, we should create a backup copy that we can restore, just in case:
sudo cp /etc/fstab /etc/fstab.backup
Next, run the following command to open the fstab file in gedit. You can also use another text editor, if you prefer.
gksu gedit /etc/fstab
Add the following text to the fstab file on a new line, replacing the _____ portion with the full UUID of your new home partition from the sudo blkid command above:
UUID=_____     /home     ext4     nodev,nosuid     0     2

image

 Save the file after adding the line.

Step 5: Move Home Directory & Restart

From a terminal, run the following command to leave your home directory, move your current home directory to a placeholder location, and create a new, empty home directory which your new partition will be mounted at:
cd / && sudo mv /home /home_old && sudo mkdir /home


image

Reboot your computer after running this command. You can restart with the following command:
sudo shutdown -r now

Clean Up

After restarting your computer, you should be able to log in normally. Ubuntu is now using the separate home partition. After making sure that everything went okay and you still have all your files in your /home directory – just in case – you can you can remove your /home_old directory to free up space:
sudo rm -rf /home_old


THANK YOU........

FOR MORE VISIT TO....

www.4stupids.in/ 

AND YES NOT TO FORGET TO SUBSCRIBE OUR 

YOUTUBE CHANNEL.........


5 COOL TRICKS OF C.M.D


http://www.guidingtech.com/assets/postimages/2012/07/coolcommandprompttricks.png


So here are some great tips you can use to make yourself comfortable while working with the Command Prompt. First things first, the shortcut for Command Prompt is cmd and that’s all you need to type in the Run box or the Start "SEARCH" in order to bring it up. Now on to the cool tricks, which might be known ones for the geeky ones among you, but on the other hand, have the potential to incite the a-ha moment for many other everyday computer users among you.

1. Open Command Prompt in a Folder

When you open the command prompt, it opens up in either User or System folder depending upon whether you ran it as administrator or not. Now the thing is, if you want to execute a file in any particular folder, you would have to use the change directory(cd) command to navigate to the folder which can be a problem if the directory is nested way too deep.


OPEN COMMAND PROMPT HERE 


To ease things you can open the folder in your "WINDOWS EXPLORER" hold Shift key when you right-click in the folder and select Run command window here  to directly open the CMD prompt with the path to that folder directly.


2. Enable QuickEdit for Easy Copy/Paste..

One thing I miss the most in Command Prompt is the ability to easily copy and paste text using the conventional Windows hotkeys. Normally, one would have to use the right-click context menu options to copy and paste text, but if you enable QuickEdit, you can do them using simple shortcuts.

quickedit 


To enable the QuickEdit mode, right-click on the Command Prompt Title Bar and select Properties. In the Properties Window under the Option Tab enable QuickEdit Mode. That’s all; you can now quickly select text by dragging your mouse pointer. Pressing the enter key on the selected text will "COPY THE TEXT TO THE CLIP BOARD", and a simple left click would be enough to paste the text.


3. Run Command Prompt as Admin

Many commands require you to run command prompt as administrator. When you search for CMD in Start Menu, other than selecting Run as administrator from the right-click menu, you can simply press Ctrl+Shift+Enter to open it with admin privileges. This trick will work for all the programs installed on your system.


4. See Command History..

You can see last used commands in a session using the navigation buttons, but if you would like to see a list of all the commands, you can get it by pressing the F7 button.

f7 

Alternatively, you can use the command doskey /history  to list these commands in the command prompt itself.

doskey history 


5. Watch Star Wars in ASCII

star wars 


For all my nerdy friends who are diehard fans of Star Wars, you can actually watch the Star Wars Episode IV movie in the command prompt. Though it would be in ASCII, it will be fun. To start the movie, open command prompt, type in telnet towel.blinkenlights.nl. and press enter. 


THANKYOU ............

FOR MORE VISIT T0 ......

www.4stupids.in/

AND YES NOT TO SUBSCRIBE OUR YOUTUBE

CHANNEL........


Tuesday, 22 March 2016

TOP 5 USES OF INTERNET

1. COMMUNICATION

Internet is today one of the most important part of our daily life. There are large numbers of things that can be done using the internet and so it is very important. You can say that with the progress in the internet we are progressing in every sphere of life as it not only makes our tasks easier but also saves a lot of time. Today internet is used for different purposes depending upon the requirement. Here in this very article we have mentioned then ten best uses of the internet. Here goes the list.

Communication


At the moment the easiest thing that can be done using the internet is that we can communicate with the people living far away from us with extreme ease. Earlier the communication used to be a daunting task but all that chanced once internet came into the life of the common people. Now people can not only chat but can also do the video conferencing. It has become extremely easy to contact the loved ones who are in some other part of the world. Communication is the most important gift that the internet has given to the common man. Email, social networking sites are some of the prime example of it. This is one such gift of the internet which is cherished by everyone and has made our life easier to much extent.

2.RESEARCH

 Research


Now the point that has been placed next is research. In order to do research you need to go through hundreds of books as well as the references and that was one of the most difficult jobs to do earlier. Since the internet came into life, everything is available just a click away. You just have to search for the concerned topic and you will get hundreds of references that may be beneficial for your research. And since internet is here to make your research public, you can then benefit a large amount of people from the research work that you have done. Research is one such thing which has got lots of benefit from this evolution of internet. Research process has now got wings and has gained the most due to the internet.


3.EDUCATION

Education 

The next point that we have in this list is education. Yes you read it right. Education is one of the best things that the internet can provide. There are a number of books, reference books, online help centres, expert’s views and other study oriented material on the internet that can make the learning process very easier as well as a fun learning experience. There are lots and lots of websites which are related to different topic. You can visit them and can gain endless amount of knowledge that you wish to have. With the use of internet for education, you are non-longer dependent on some other person to come and teach you. There are various number of tutorials available over the internet using which you can learn so many thing very easily. There can’t be any excellent use of the internet other than education as it is the key to achieve everything in life.


4. Financial Transaction


Financial Transaction 

The next use mentioned here is financial transaction. Financial transaction is the term which is used when there is exchange of money. With the use of internet in the financial transaction, your work has become a lot easier. Now you don’t need to stand in the queue at the branch of your particular bank rather you can just log in on to the bank website with the credential that has been provided to you by the bank and then can do any transaction related to finance at your will. With the ability to do the financial transaction easily over the internet you can purchase or sell items so easily. Financial transaction can be considered as one of the best uses of resource in the right direction. 

5. Real Time Updates

Real Time Updates 


Real time updates have been placed at the number fifth position here. This has been mentioned here in regards to the news and other happenings that may be on-going in different parts of the world but with the use of internet we come to know about it very easily and without any difficulty. There are various websites on the internet which provides you with the real time updates in every field be it in business, sports, finance, politics, entertainment and others. Many a time the decisions are taken on the real time updates that are happening in various parts of the world and this is where internet is very essential and helpful.

THANK YOU........

FOR MORE VISIT TO............

4stupids 

AND YES NOT TO FORGET TO SUBSCRIBE OUR

YOUTUBE CHANNEL...


How to tell if your phone is rooted

HOW TO INSERT GTA SAN ANDREAS MODS USING IMG TOOL

How to Mod GTA Sa In IMG Tool 2.0
In this tutorial you will learn how to place mods in your "gta3.img" file in your GTA San Andreas models folder.
Posted by - Intermediate Players Modelling
In this tutorial you will learn how to place mods in your "gta3.img" file in your GTA San Andreas models folder.
First of all the "gta3.img" files is the one that haves most part of the game models, textures, collision files, some path nodes and some animation files.
Things you can install in SA with the "gta3.img" file:
  • Car mods.
  • Weapon mods.
  • Player mods.
  • Map mods.
  • Any texture mod.
There also others files with the ".img" extension, like "player.img" that has all the player clothes and vestments you can buy in the game, including the hair styles also.
What do you need to install mods in the IMG's?
  • An IMG editing tool.
Note that not all released IMG editing tools work with every GTA. It is recommended you find the very latest release of a program in order for it to work with the latest games. Always read the readme.
Some common IMG editing programs are:
You can find them in the Tools section of GTAGarage (Gtagarage.com).
Now that you downloaded the IMG Tool you can open it, the first thing you will see is this:
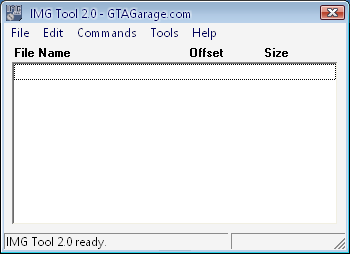
IMG Tool interface.


Well, now you can open the "gta3.img" file from the models folder of your GTA San Andreas. When done the IMG TOOL will load all the archives that are inside the IMG file, this can take some time depending of the computer. When done you will see something like this:
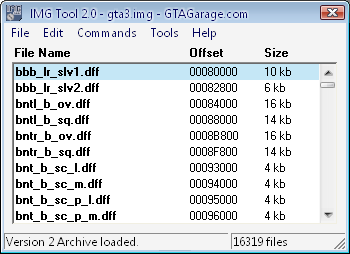

IMG Tool - gta3.img loaded.


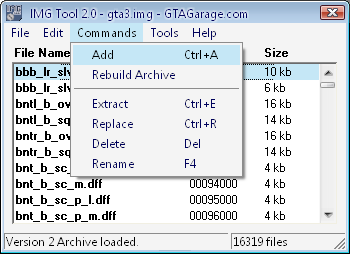
There you will see all the files inside the gta3.img. Now i will teach you how to ADD new files in the archive. In fact most of the mods are for replacing existing files, like cars, weapons ans so on. But for this example in my Night Vision Crimes you have to ADD 2 files, "nikko.dff" and "nikko.txd". Check this image:


IMG Tool - How to ADD


You have to click "Commands" then "Add" and now you have to search in your computer the files you want to ADD to your gta3.img. In my example case the "nikko.dff" and then the "nikko.txd" . Alway add or replace 1 file at at time.
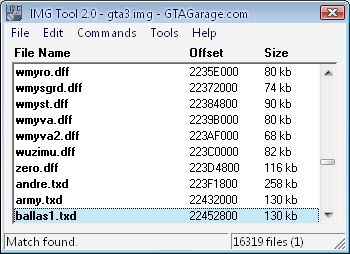


IMG Tool - Search


Now when you have to Replace an existent file you first have to search it in the gta3.img, to do this you have to go to "Edit" then "Search", type the name of the file you have to put as a replace in the gta3.img. For example: you have to replace the "ballas1.txd" file because in my mod is a slightly different texture included in the Fix Patch, you type that "ballas1.txd" in the search and the IMG Tool will search it. Now you are ready to replace:

Click on "Commands" then "Replace" and search for the exact file the IMG Tool found, in your computer. Then hit ok and the old "ballas1.txd" will be replaced with the one you have.
Thats all for Adding or Replacing files in the IMG's files. I hope you learn something useful today.
PS: Rebuild The Archive When Done!!


THANK YOU.........

FOR MORE VISIT TO......

www.4stupids.in/

AND YES NOT TO FORGET TO SUBSCRIBE

OUR YOUTUBE CHANNEL......

HOW CAN I SHUTDOWN OTHER PC USING C.M.D


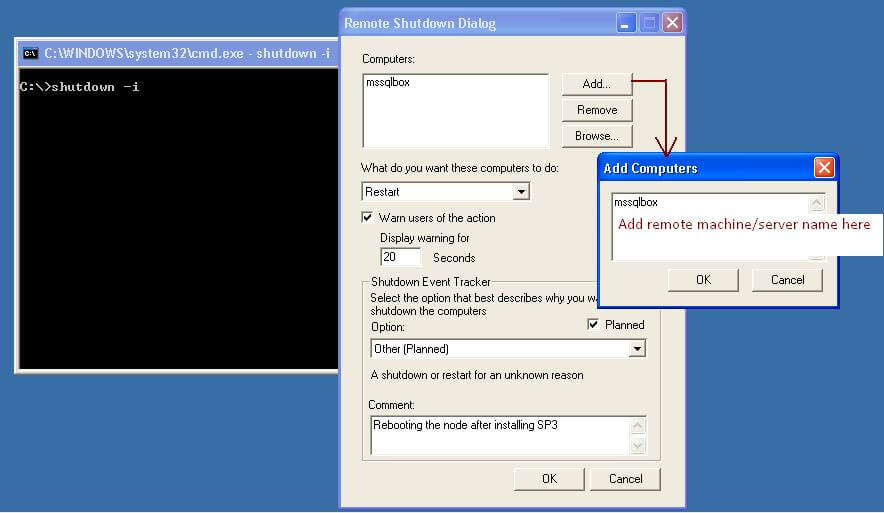
1.FIRST OF ALL OPEN CMD....
   IMPORTANT NOTE: YOU MUST CONNECT TO A WIRELESS 
                                       NETWORK.........


https://www.mssqltips.com/tipimages2/2010_shutdowngui.jpg


2.AFTER THAT TYPE THERE "shutdown -i"


3.AT THIRD STEP YOU CAN SEE A "DIALOG BOX"....


4.AT THAT DIALOG BOX YOU  HAVE TO CLICK ON "ADD"
   BUTTON...ON THAT "ADD" BUTTON YOU HAVE TO
   GIVE THE SERVER NAME...

5.AT LAST YOU CAN SELECT "RESTART/SHUTDOWN/SLEEP" ..........


THANK YOU...............

FOR MORE VISIT TO OUR SITE ....

www.4stupids.in/

AND YES NOT TO FORGET TO SUBSCRIBE

OUR YOUTUBE CHANNEL.....................

HOW TO CREATE A HOTSPOT USING C.M.D

1.FIRST OF ALL OPEN C.M.D

2.AT SECOND YOU HAVE TYPE A CODE ON
    C.M.D.

https://swapnilkatre.files.wordpress.com/2014/08/create-a-wifi-hotspot-using-the-command-prompt-step-5.jpg

3.THAT CODE IS "netsh wlan set hostednetwork mode=allow
    ssid=4stupids key=4stupids"

4.THEN YOU CAN SEE ON YOUR ANY DEVICE..
   A NETWORK NAMED "4STUPIDS".........


THANK YOU..........

FOR MORE YOU CAN VISIT OUR 

OFFICIAL SITE.....

www.4stupids.in/ 

AND YES NOT TO FORGET TO

SUBSCRIBE OUR YOUTUBE CHANNEL...   

Restore system files and settings in WINDOWS 7

System Restore helps you restore your computer's system files to an earlier point in time. Typically, you want to restore your computer to a restore point that was created just before the date and time when you started noticing problems. The descriptions of the restore points that are created automatically correspond with the name of an event, such as Windows Update installing an update. System Restore returns your computer to the state that it was in before the restore point that you choose.

To restore system files and settings using a recommended restore point

  1. Open System Restore by clicking the Start button Picture of the Start button. In the search box, type System Restore, and then, in the list of results, click System Restore. Administrator permission required If you're prompted for an administrator password or confirmation, type the password or provide confirmation.
  2. Click Recommended restore, and then click Next.
    If there isn't a recommended restore point, follow the steps below to choose a specific restore point.
  3. Review the restore point, and then click Finish.

To restore system files and settings using a specific restore point

  1. Open System Restore by clicking the Start button Picture of the Start button. In the search box, type System Restore, and then, in the list of results, click System Restore. Administrator permission required If you're prompted for an administrator password or confirmation, type the password or provide confirmation.
  2. Do one of the following:
    • If there is a recommended restore point, click Choose a different restore point, and then click Next.
    • If there isn't a recommended restore point, click Next.
  3. Click the restore point that you want, and then click Next.
    To view the programs and drivers that will be affected (which could include programs that will be deleted), click Scan for affected programs.
  4. Review the restore point, and then click Finish.

HOW CAN I TEST CHECK MY INTERNET SPEED

1.FIRST OF ALL VISIT THIS SITE "WWW.SPEEDTEST.NET"

https://encrypted-tbn3.gstatic.com/images?q=tbn:ANd9GcTN15bCxSS46XXECx0dOKAvMkUDX5JGYvk08WVwmTFpdvcFiQCp


2.YOU CAN SEE THERE ......
    THERE SOMEWHERE WRITTEN "TEST YOUR SPEED"
    AFTER CLICKING THAT YOU CAN SEE YOUR ORIGINAL
    SPEED.....


http://www.howtogeek.com/wp-content/uploads/2013/06/650x405xspeedtest.png.pagespeed.gp+jp+jw+pj+js+rj+rp+rw+ri+cp+md.ic.AWQb4LMxKT.png


3.IF YOU WANT TO TEST YOUR SPEED ONCE AGAIN.....
   THEN YOU HAVE TO CLICK "TRY AGAIN"...........


THANK YOU.....

FOR MORE YOU CAN VISIT OUR SITE

www.4stupids.in

AND YES NOT TO FORGET TO SUSCRIBE 

OUR YOUTUBE CHANNEL.........